ON Board Documentation
Complete guide to using, configuring, and administering the ON Board user provisioning platform.
What is ON Board?
ON Board is the internal user provisioning platform for Harris Computer. It covers the full lifecycle of onboarding a new employee — from submitting a request to a fully provisioned Microsoft 365 account — with AI-assisted scoring, automatic user creation, Teams Phone integration, and mailbox management.
Everything runs in your browser. There is no backend server — ON Board authenticates via Microsoft (MSAL) and makes direct Microsoft Graph API calls to create users and manage SharePoint data.
Who uses it?
| Role | Group | Access Level |
|---|---|---|
| HR / Team Lead (L1) | Onboard-L1 |
Submit requests via Asana (read-only in the app) |
| IT Admin (Approver) | Onboard-Approvers |
Full access — approve, edit, delete, configure |
Onboard-Approvers or Onboard-L1.
Signing In
When you first open ON Board, you will see a Sign In Required screen with a single button.
A Microsoft login popup opens.
Use your work account, e.g. m.heuberger@harriscomputer.eu.
Your name appears in the top-right of the header after sign-in.
The Dashboard — Your Starting Point
After signing in, you land on the main dashboard. This is where all active work happens.
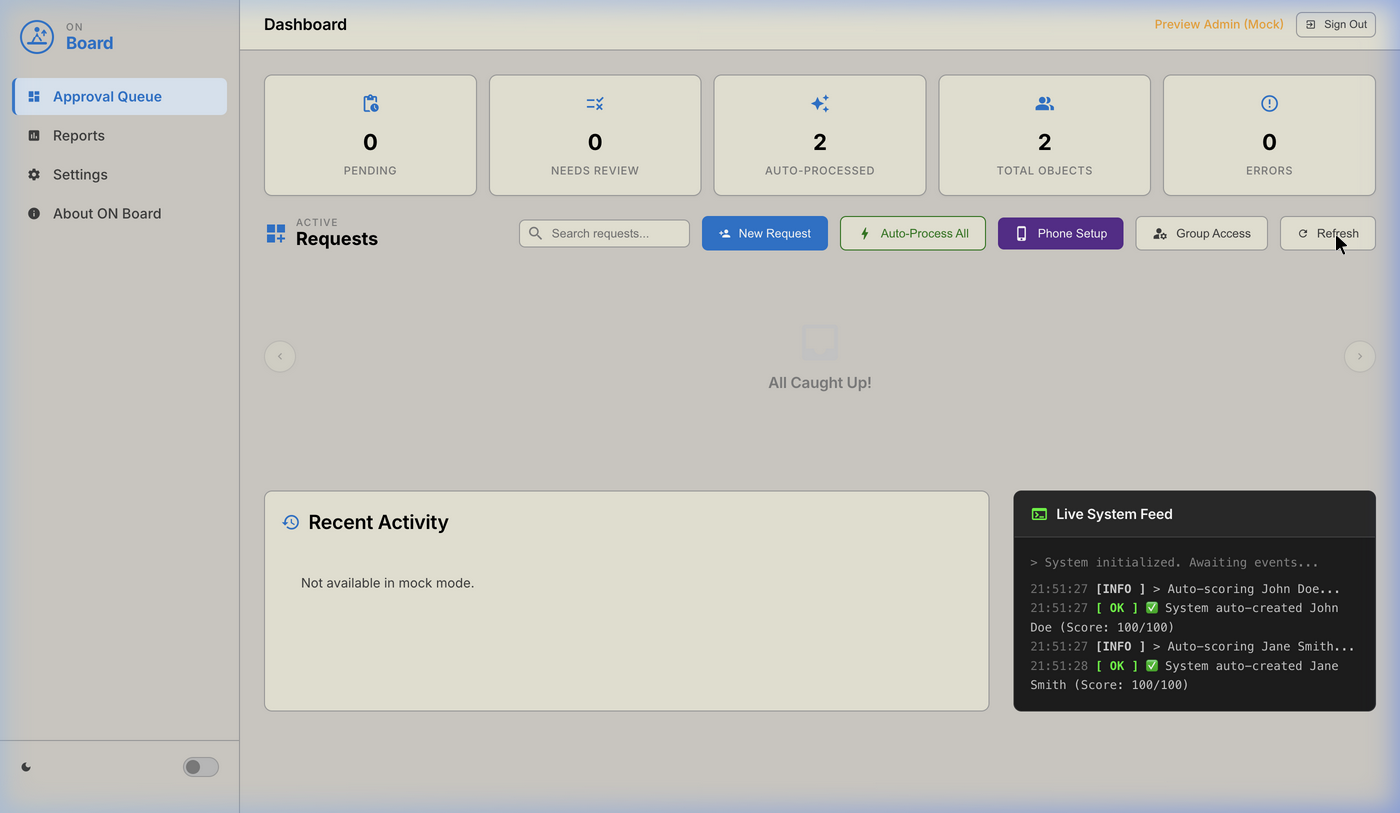
The main dashboard: KPI bar (top), Active Requests queue (centre), Recent Activity & Live Feed (bottom)
The License Tiles
Three compact tiles sit across the top of the main area. They show live M365 license
consumption pulled directly from your tenant via Microsoft Graph, displayed as
used / total.
| Tile | What it shows |
|---|---|
| M365 E3 LICENSES | E3 seats consumed vs. total purchased |
| COPILOT LICENSES | Microsoft 365 Copilot seats consumed vs. purchased |
| TEAMS PHONE STD | Teams Phone Standard (MCOEV) seats consumed vs. purchased |
— / — while loading or if the SKU is not present in
your tenant.The Active Requests Queue
Each request appears as a card in the queue. Cards show:
- Left column: Status badge (READY / NEEDS REVIEW / LOW CONFIDENCE), display name, company, and target email (UPN)
- Middle column: AI Confidence Score bar (0–100), job title and department badges
- Right column: Action buttons (Delete / Edit / Approve) and per-request options (Phone Lic checkbox)
The queue is fully scrollable — all requests are visible by scrolling down within the section. There is no pagination. Clicking anywhere on the card body (not the buttons) opens the full Request Details preview.
The Toolbar Buttons
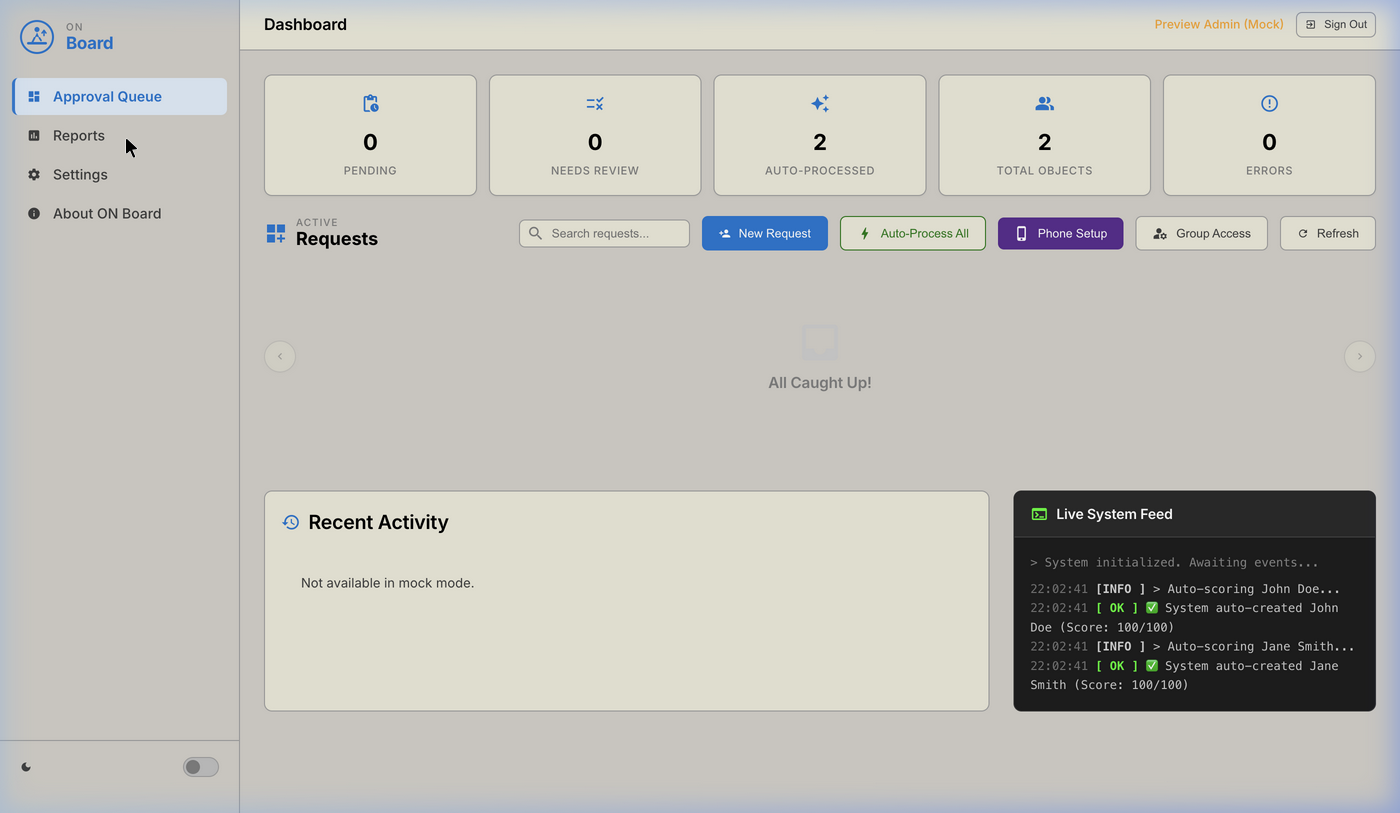
The toolbar above the request cards
| Button | What it does |
|---|---|
| 🔍 Search requests… | Filter cards in real time as you type (name, company, UPN, title, department) |
| ➕ New Request | Open the new user request form |
| ⚡ Auto-Process All | Score + auto-create all high-confidence pending requests immediately |
| 📱 Phone Setup | Provision a Teams Phone number for an existing user |
| 👥 Group Access | Manage Distribution List memberships and Shared Mailbox permissions |
| 🔄 Refresh | Reload all requests from SharePoint |
Recent Activity & Live System Feed
Recent Activity (bottom-left) shows the 15 most recently updated entries from SharePoint — useful to track what has been created or changed across all sessions.
Each row is clickable. Clicking a row opens an Activity Detail modal. If the entry is linked to an OnboardingRequest, an "Edit Request" button appears in the modal footer — clicking it opens the full Edit Request form for that record.
Live System Feed (bottom-right) is a real-time terminal that logs every action ON
Board takes during your current session — auto-scoring, user creation, warnings, and errors. Each
line shows a timestamp, a colour-coded tag (INFO / OK / WARN
/ ERR), and a description.
How to: Submit a New User Request
This is the most common task. Use it every time a new employee needs to be onboarded.
Click the blue New Request button in the toolbar.
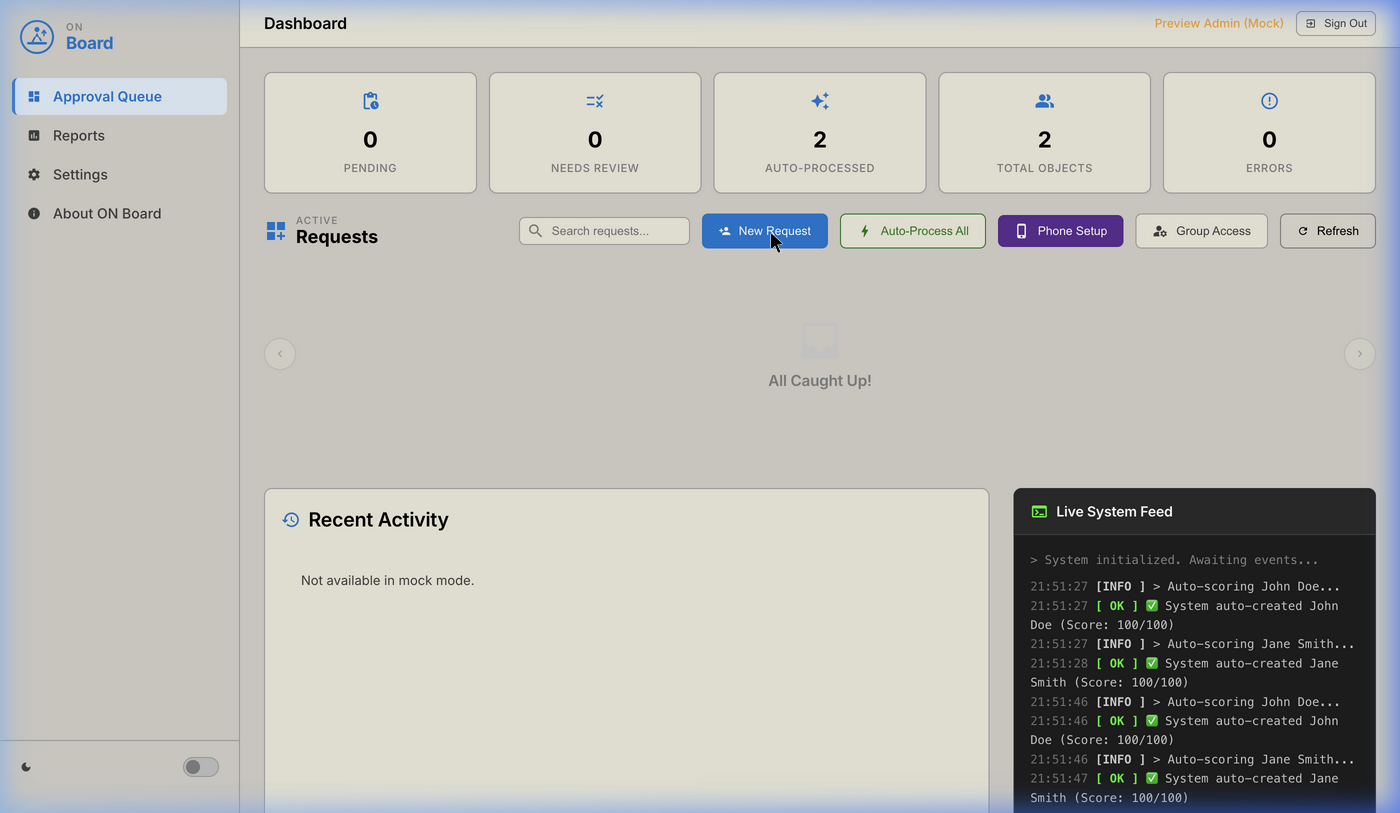
The New Request button in the toolbar
A modal overlay with four sections appears.
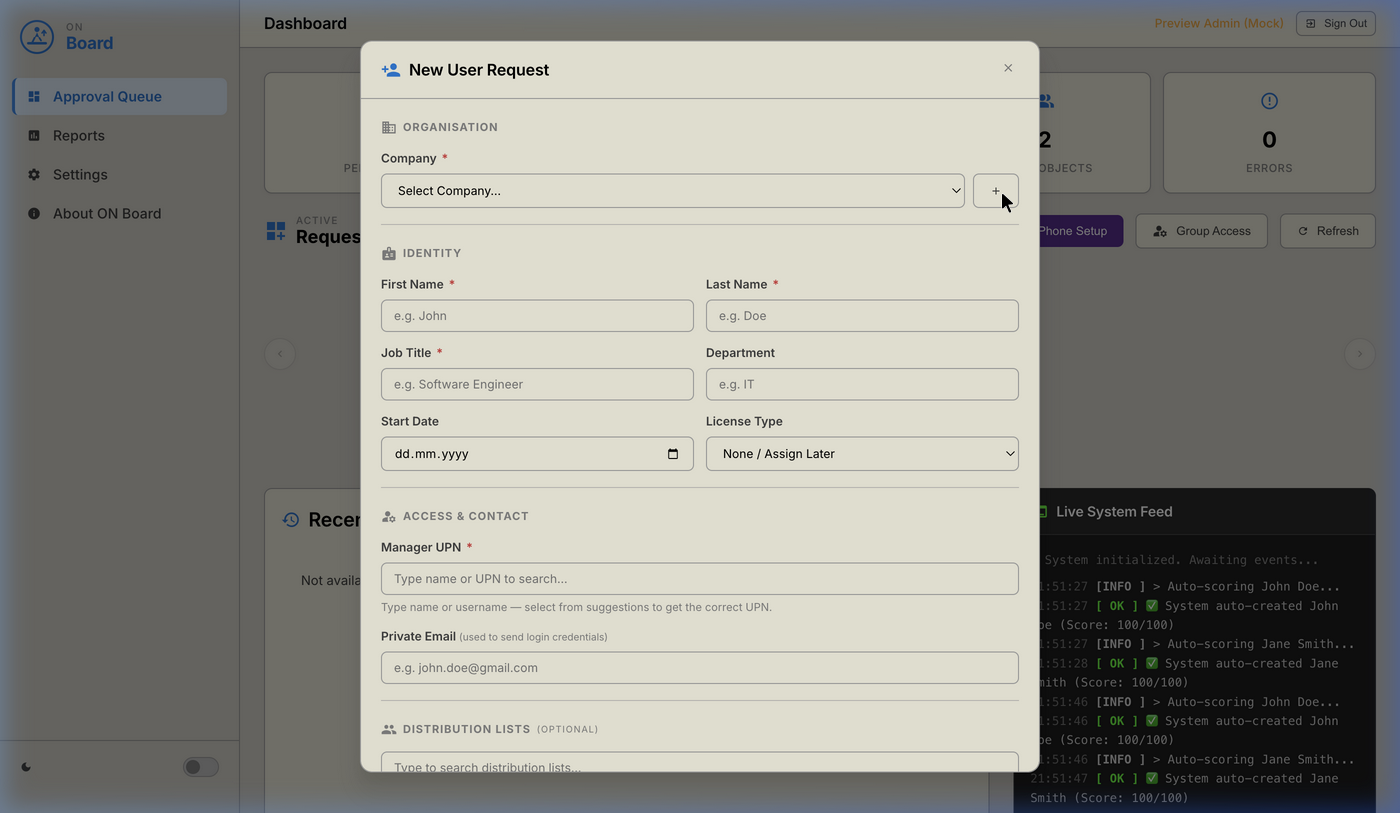
The New User Request form
Click the Company dropdown and select the company this person belongs
to. The company determines the email domain (e.g. selecting Harris Computer
Germany → firstname.lastname@harriscomputer.eu).
If the company isn't listed yet, click the + button to the right of the dropdown. See Add a New Company.
| Field | Required | Notes |
|---|---|---|
| First Name | ✅ | Only the first word is used for the email (e.g. "Jan Friedrich" →
jan)
|
| Last Name | ✅ | Used in full for the email address |
| Job Title | ✅ | Their role, e.g. Software Engineer |
| Department | Optional — omitting it reduces the AI score | |
| Start Date | Optional — recorded on the request for reference | |
| License Type | E3, E5, F3, or None / Assign Later |
Manager UPN (required): Start typing the manager's name or email. Wait half a second — a dropdown of matching Azure AD users appears. Click the correct person — this fills in their full UPN automatically. Do not type the full UPN by hand unless the person is not found.
Type part of a list name (e.g. "HR", "Sales-Team") in the Distribution Lists search field, select from the dropdown. Each selection appears as a chip. Click × to remove a chip.
Click the blue Submit Request button. The request is saved to SharePoint. The AI engine runs immediately — if the score is ≥ 80, the user account is created in Azure AD automatically. If below 80, the card appears in the queue under Needs Review for manual action.
How to: Add a New Company
If the company doesn't appear in the Company dropdown when creating a request, add it first.
While the New User Request form is open, click the + button to the right of the Company dropdown.
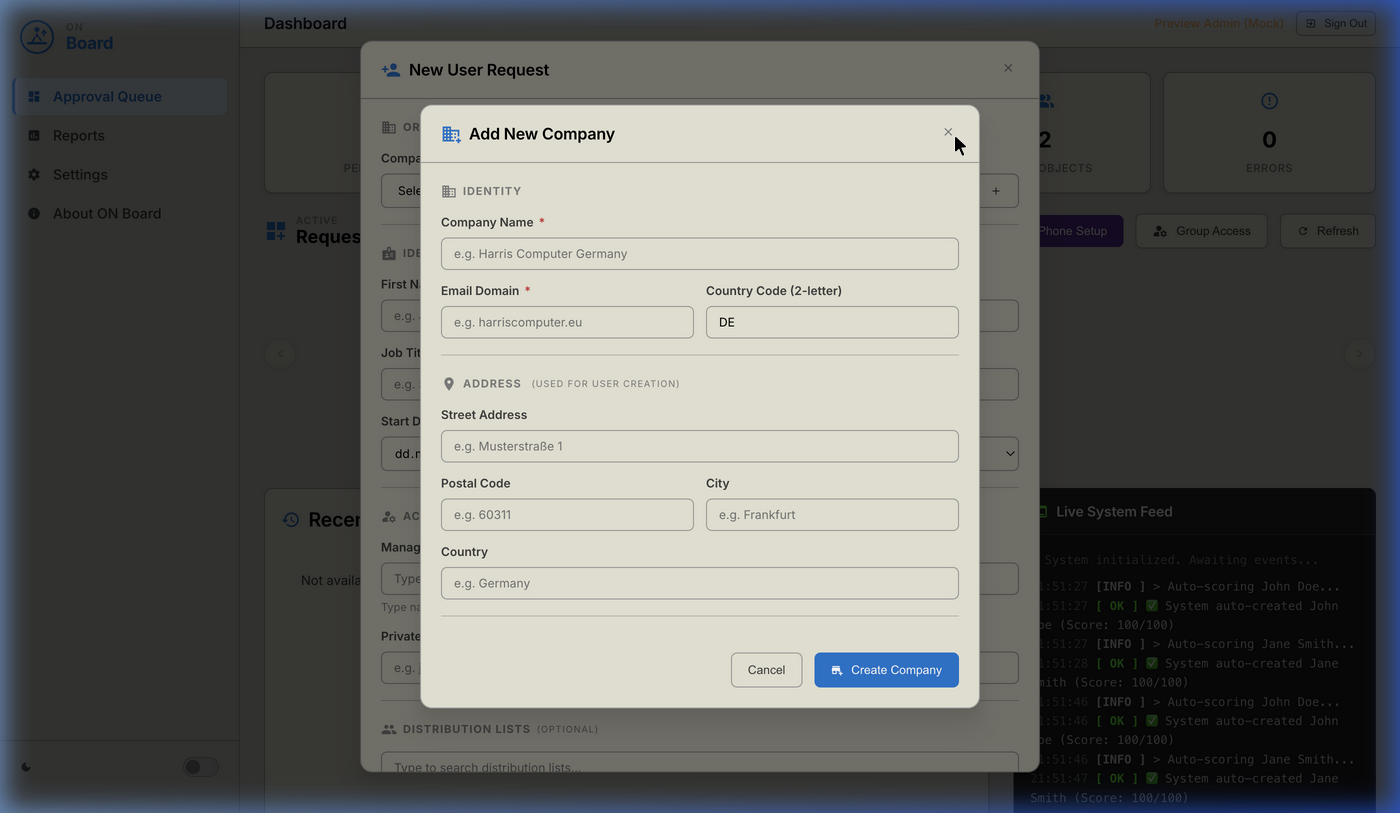
The Add New Company modal
| Field | Required | Example |
|---|---|---|
| Company Name | ✅ | Harris Computer Germany |
| Email Domain | ✅ | harriscomputer.eu (no @ prefix, no https://) |
| Country Code | DE (defaults to DE) |
|
| Street Address | Musterstraße 1 | |
| Postal Code | 60311 | |
| City | Frankfurt | |
| Country | Germany |
firstname.lastname@[Email Domain]. Make sure it matches the actual domain
in Azure AD exactly.
The modal closes and the new company is immediately available in the Company dropdown of the parent form.
How to: Review a Request (Preview)
Before approving, you can inspect all details of a request.
(Not on a button.) The Request Details modal opens.
The modal shows:
- Status banner — person's name, current status, company, and AI score
- Identity section — First/Last Name, Job Title, Department, Start Date
- Access & Contact — Work Email (UPN), Manager UPN, Private Email, Business Phone, License Type
- AI Scoring Notes (if score < 100) — specific reasons for deductions, e.g. "No private email provided", "Manager UPN could not be verified"
Click Edit to open the edit form and fix any issues. Click Close to go back. Or close the preview and use the card's Approve button to provision the user.
How to: Edit a Request
Use this to correct or update any field before approving.
Click Edit on the request card, or click Edit from inside the Request Details preview. The Edit Request modal opens, pre-filled with the current values.
All the same fields as the new request form are available, plus:
- Target UPN (Preview) — a read-only field that shows the generated email address. It updates live as you change the name or company — useful to confirm the UPN before saving.
The request is updated in SharePoint and the AI score is recalculated. The card refreshes on the dashboard.
How to: Approve a Request (Create the User)
Approving a request triggers the full provisioning sequence in Azure AD.
Before clicking Approve, check the optional checkbox in the bottom-right of the card:
| Option | What it does |
|---|---|
| Phone Lic | Also assigns a Teams Phone Standard license during provisioning. Only check if the user needs a Teams Phone number. |
A loading overlay appears showing the current provisioning step (e.g. "Creating user…", "Assigning license…").
What happens automatically:
- Azure AD user account is created with the calculated UPN
- Microsoft 365 license is assigned (if selected)
- User is added to all default groups (
AllStaff,Office365-Users,Teams-Users) - User is added to any Distribution Lists selected on the request
- Manager relationship is set in Azure AD
- If Phone Lic is checked: Teams Phone Standard license is assigned
- Request status updated to Created in SharePoint
A green success toast appears (e.g. "✅ John Doe created successfully"). The card is removed from the queue. The Live System Feed logs the full sequence.
If provisioning fails, a red error notification appears and the card stays with status Failed so you can retry or investigate.
How to: Delete a Request
Click the red Delete button on a request card.
The request is permanently removed from SharePoint and disappears from the queue.
How to: Auto-Process All High-Confidence Requests
Use this to clear the entire queue of high-scoring requests in a single click — no need to approve each one individually.
The system immediately runs the AI scoring engine against every Pending request in the queue.
- Requests scoring ≥ 80 are automatically created in Azure AD (same provisioning sequence as a manual approval)
- Requests scoring < 80 are moved to Needs Review and remain in the queue
Progress is logged in real time in the Live System Feed terminal.
After the process completes, the KPI bar updates: AUTO-PROCESSED shows how many were created; NEEDS REVIEW shows how many still need attention.
How to: Search and Filter the Queue
Labelled "Search requests…"
Cards are filtered instantly as you type. The search matches against: name, company, UPN, job title, and department.
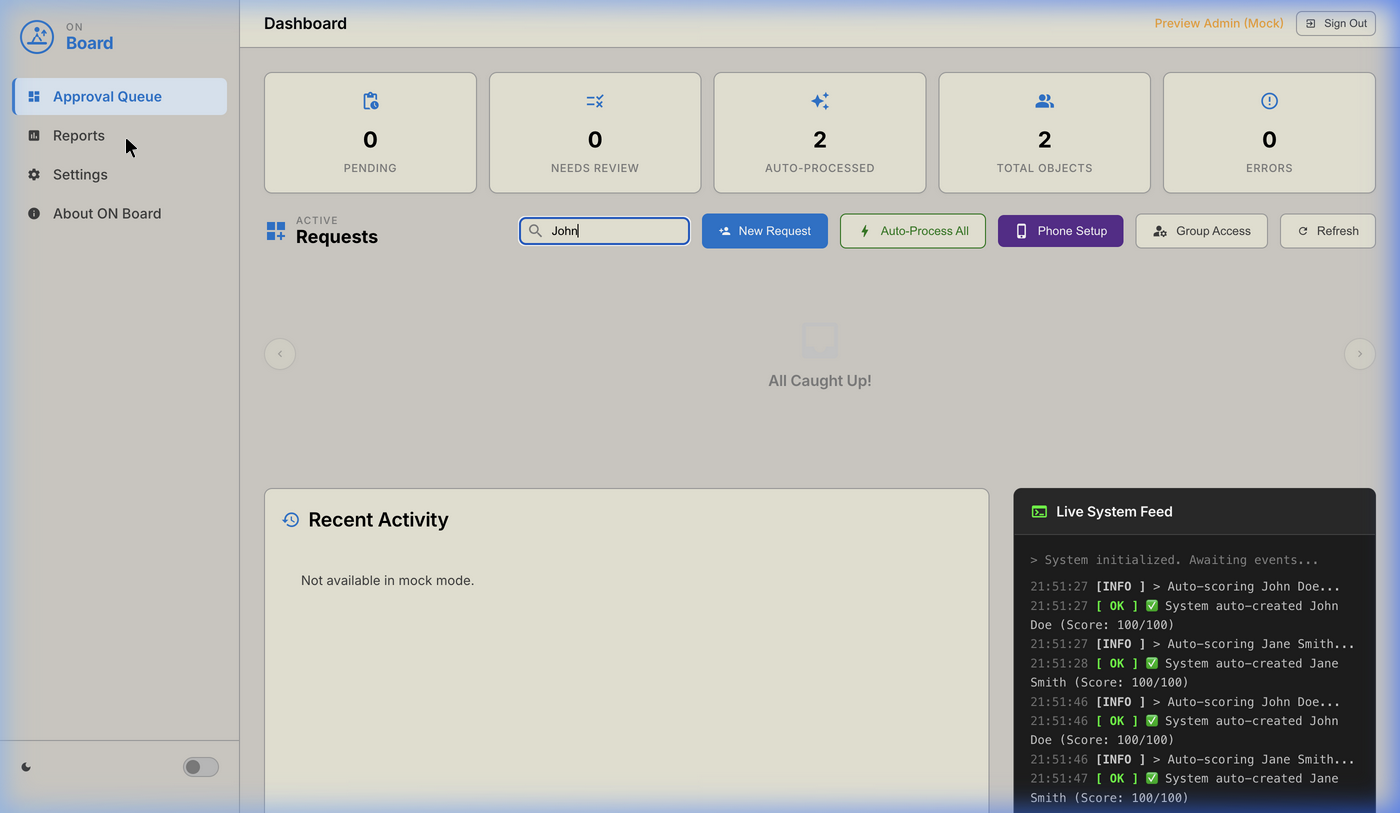
The queue filtered by search term
Delete the text in the search box to show all requests again.
How to: Set Up a Teams Phone Number
Use this to assign a Teams Direct Routing phone number to a user who already has an account in Azure AD.
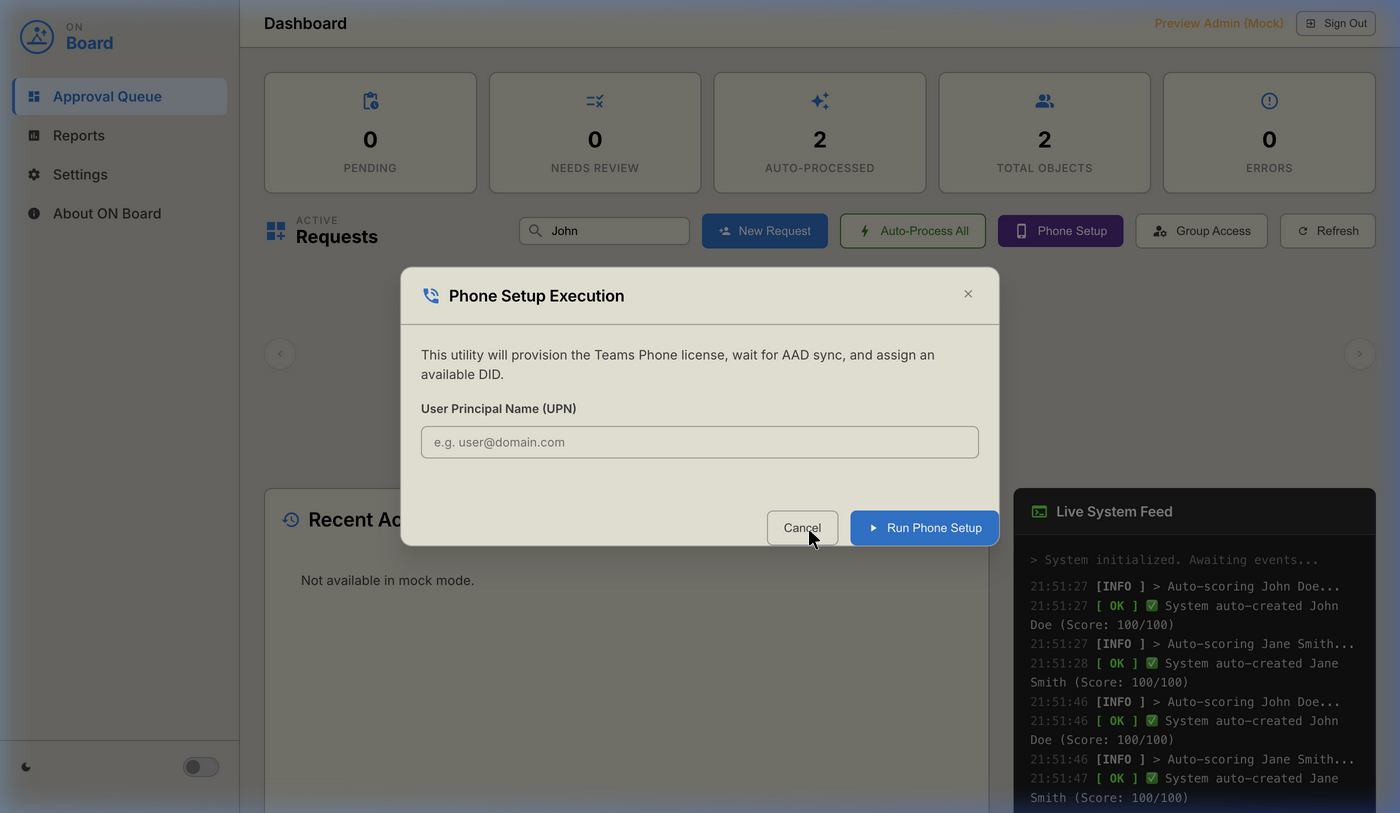
The Phone Setup modal
Type the full work email address of the user who needs a phone number (e.g.
john.doe@harriscomputer.eu).
A terminal panel expands below, showing each step as it executes:
> Initiating Microsoft Graph connection...
> Validating UPN: john.doe@harriscomputer.eu
> Checking existing SKU bounds...
> Assigning Teams Phone Standard license...
> Waiting for AAD sync...          ← this takes up to 2 minutes
> Querying available DIDs...
> Done — assigning phone number...
The runbook (Invoke-TeamsPhoneAssignment.ps1) runs in Azure Automation in
the background. The wait time is configurable in Settings.
The process takes 2–5 minutes. The terminal will show a green "Done" line when finished. If anything fails, an error line appears with details.
How to: Manage Distribution List Memberships
Use this to add an existing Azure AD user to one or more Distribution Lists — for example when someone changes team, or a DL was missed during onboarding.
The Group & Mailbox Access modal opens on the Distribution Lists tab.
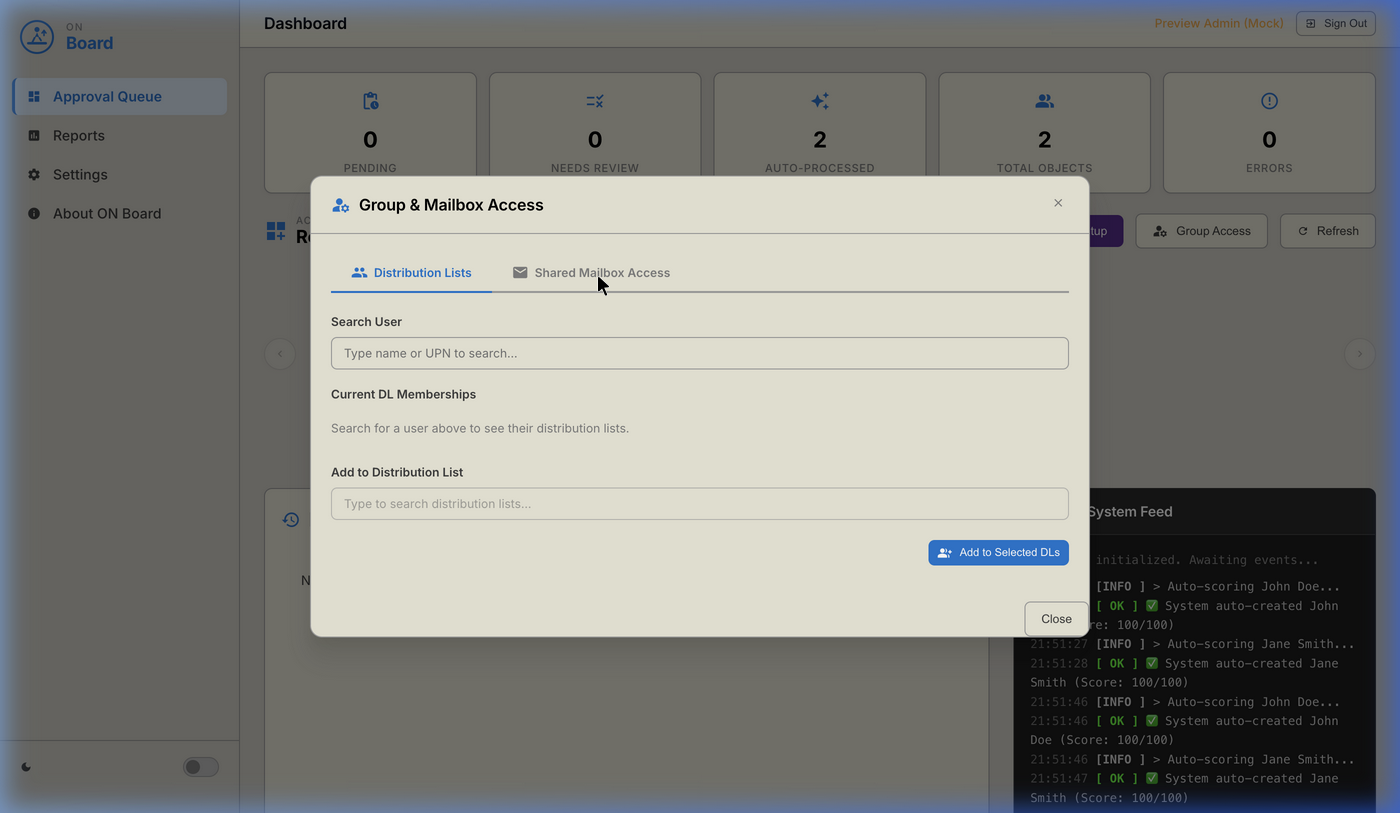
Group & Mailbox Access — Distribution Lists tab
Click into Search User and type the person's name or UPN. Select them from the results. Their Current DL Memberships appear automatically below.
Click into the Add to Distribution List search box, type a list name, and select from the dropdown. Each selection appears as a chip.
The user is added to all selected DLs via Microsoft Graph. A success notification confirms.
How to: Grant or Revoke Shared Mailbox Access
Use this to give a user access to a shared mailbox — or remove access they no longer need.
Click Group Access in the toolbar, then click the Shared Mailbox Access tab.
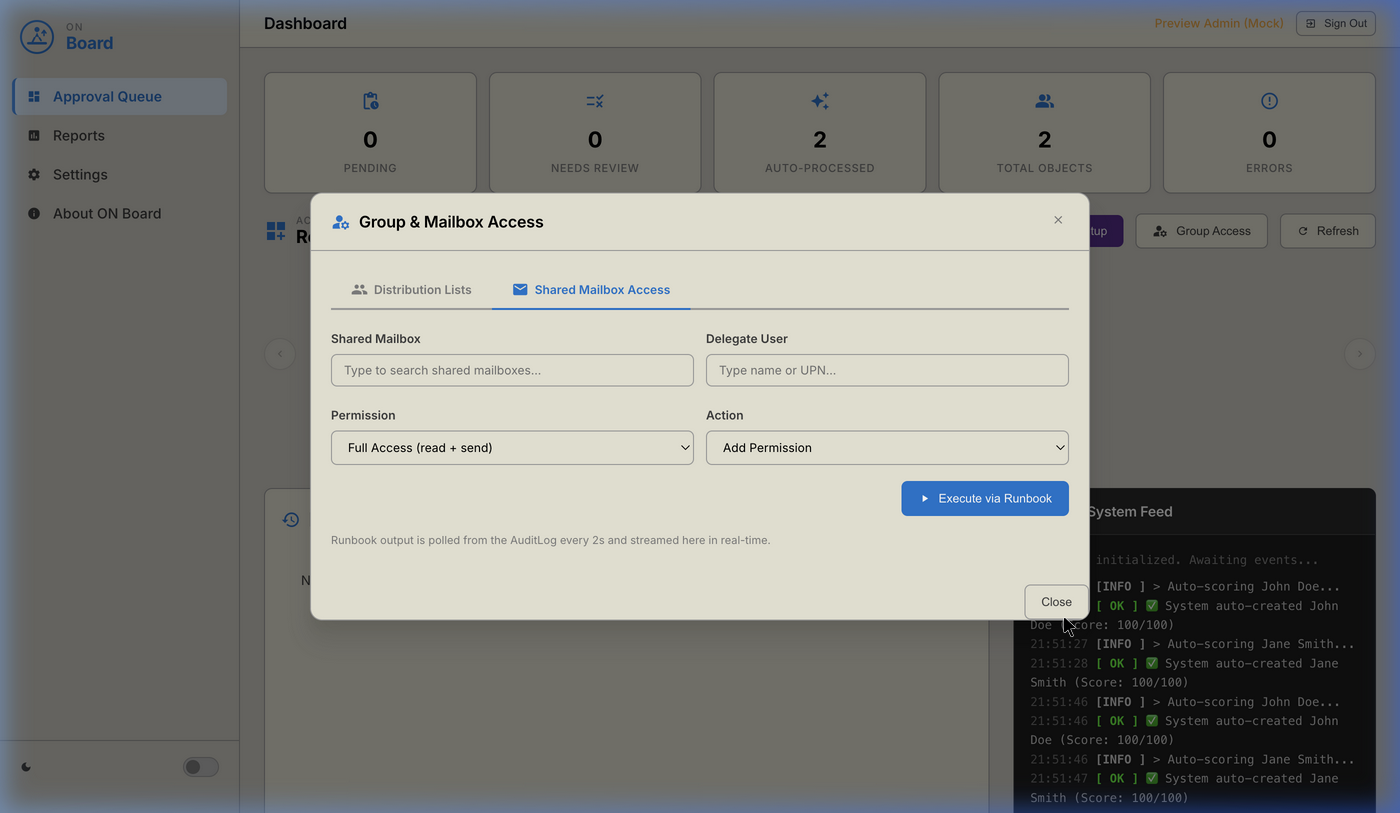
Group & Mailbox Access — Shared Mailbox Access tab
| Field | What to enter |
|---|---|
| Shared Mailbox | Type to search for the mailbox (e.g. info@, support@) and select it |
| Delegate User | Type to search for the person who should receive/lose access |
| Permission | Choose one (see table below) |
| Action | Add Permission to grant access, Remove Permission to revoke it |
Permission types
| Permission | What the user can do |
|---|---|
| Full Access (read + send) | Read all mail in the mailbox and send from it — appears in Outlook as a secondary mailbox |
| Send As | Send email that appears to come from the mailbox address |
| Send on Behalf | Send email showing "User Name on behalf of Mailbox Name" in the From field |
The action runs via the Invoke-MailboxPermission.ps1 runbook in Azure
Automation. A live terminal panel appears below, streaming the output (polled from
SharePoint AuditLog every 2 seconds).
How to: View Provisioning Reports
The Provisioning Reports modal opens.
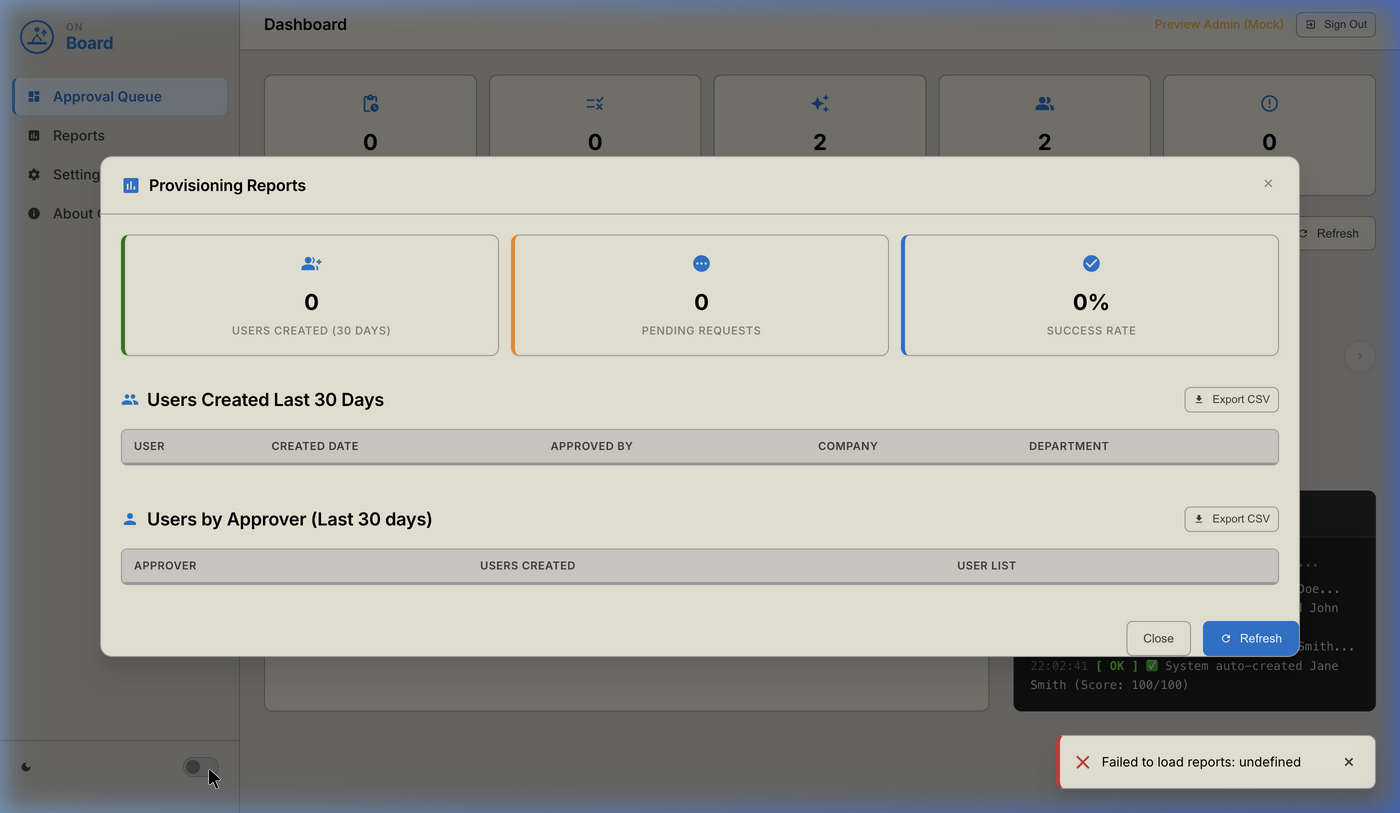
The Provisioning Reports modal
Three KPI cards: Users Created (30 days) · Pending Requests · Success Rate
Two tables:
- Users Created Last 30 Days — User · Created Date · Approved By · Company · Department
- Users by Approver (Last 30 days) — Approver · Users Created · User List
Both tables have an Export CSV button. Click it to download the table
data as a .csv file you can open in Excel.
Click the Refresh button in the modal footer to reload the latest data from SharePoint.
Reference: Request Status Meanings
| Status | Badge | Meaning |
|---|---|---|
| Pending | Pending | Request submitted — AI scoring hasn't run yet, or score is still being calculated |
| Needs Review | Needs Review | AI score was below the threshold — a human needs to review and decide |
| Approved | Approved | A human approved it — provisioning is starting |
| Creating | Creating | User creation is in progress in Azure AD right now |
| Created | Created | The user account exists in Azure AD — provisioning complete |
| Failed | Failed | Provisioning attempt failed — see the Live System Feed for the error |
| Rejected | Rejected | An approver rejected the request — no user was created |
Reference: How UPNs Are Generated
ON Board automatically builds the User Principal Name (the user's work email / login) from the request data.
Formula: [firstname].[lastname]@[company-email-domain]
Rules applied to the name
- Only the first word of the first name is used (e.g. "Jan Friedrich" →
jan) - German umlauts are expanded to standard ASCII:
ü→ue,ö→oe,ä→ae,ß→ss - Other accented characters are decomposed to their base letter (e.g.
é→e) - Everything is lowercased
Examples
| Name | Company | Generated UPN |
|---|---|---|
| John Doe | Harris Computer Germany | john.doe@harriscomputer.eu |
| Jan Friedrich Müller | SIV.AG | jan.mueller@siv.de |
| Felix Lüthke | SIV.AG | felix.luethke@siv.de |
| Anne-Marie Schulz | Harris Computer Germany | annemarie.schulz@harriscomputer.eu |
Collision handling
If the generated UPN already exists in Azure AD, the system tries john.doe1@…, then
john.doe2@…, up to john.doe9@…. The resulting UPN is shown as a read-only
preview in the Edit Request modal.
Reference: The AI Confidence Score
Every request is scored 0–100 before any action is taken. The score reflects how complete and valid the request data is.
| Score | Card Badge | What it means | What happens |
|---|---|---|---|
| 80–100 | ✅ READY | All critical fields are present and verifiable | Auto-created — no human action needed |
| 50–79 | 🔍 NEEDS REVIEW | Some fields are missing or could not be verified | Stays in queue — needs manual approval |
| 0–49 | ❌ LOW CONFIDENCE | Multiple critical fields are missing or invalid | Stays in queue — should be edited before approval |
Common reasons for score deductions
- Private email not provided
- Manager UPN could not be found in Azure AD
- Department field is empty
- Company not found in the CompanyDomains list
- Start date is in the past
Frequently Asked Questions
The AI engine may have auto-processed it immediately (score ≥ 80). Check:
- The AUTO-PROCESSED counter in the KPI bar — if it went up, the user was created automatically
- The Live System Feed — you'll see a green
[OK]line for the creation - The Recent Activity panel — it will show the request with status Created
If none of these show it, click Refresh — the queue may just not have reloaded yet.
Open the request by clicking the card body, then scroll to AI Scoring Notes. Common hidden issues:
- The manager UPN was typed manually and couldn't be verified — try re-typing it in the search field and selecting from the dropdown
- The company's email domain in CompanyDomains doesn't match the Azure AD domain exactly
- Check the Live System Feed — the red
[ERR]line shows what failed - Common causes: license SKU GUID not configured in Settings, the UPN already exists, or a network timeout
- Fix the underlying issue, then click Approve again — the card stays in the queue for retries
Sites.ReadWrite.All permissions on the ONBoard SharePoint
site.localhost. You can also force it via
Settings → Enable Mock Mode. Never run with Mock Mode enabled in
production — changes will not be saved and no real users will be created.
Admin: Setup & Prerequisites
Prerequisites
- Azure AD tenant with admin access
- Azure AD App Registration with delegated permissions (see below)
- SharePoint Online site at
/sites/ONBoardwith two lists - User Administrator role for the admin using the app
1. Azure AD App Registration
| Field | Value |
|---|---|
| App ID | 572798ba-7643-4ffc-b457-f28fa8dad7ac |
| Tenant ID | 4ae01105-2790-4652-bbcb-c6dd32603e18 |
Required API Permissions (Delegated)
| Permission | Description |
|---|---|
User.Read |
Sign-in and read own profile |
User.ReadWrite.All |
Create and manage all users |
Group.ReadWrite.All |
Manage group memberships |
Sites.ReadWrite.All |
Read/write SharePoint lists |
Directory.ReadWrite.All |
Manage directory objects (manager assignment) |
Redirect URIs (Authentication → Web)
https://zealous-island-0a17abf03.4.azurestaticapps.net(production)http://localhost:4280(local development with SWA CLI)
2. SharePoint Setup
Site URL: https://harriscomputereu.sharepoint.com/sites/ONBoard
List: OnboardingRequests
List ID: 65c922cf-3da8-4621-b53c-8c531992b3c0
| Display Name | Internal Name | Type |
|---|---|---|
| Title | Title |
Text |
| Status | field_2 |
Choice (Pending, NeedsReview, Approved, Creating, Created, Failed, Rejected) |
| FirstName | field_6 |
Text |
| LastName | field_7 |
Text |
| DisplayName | field_8 |
Text |
| UserPrincipalName | field_9 |
Text |
| MailNickname | field_10 |
Text |
| Company | field_12 |
Text |
| Department | field_14 |
Text |
| JobTitle | field_16 |
Text |
| ManagerUPN | field_19 |
Text |
| StartDate | field_21 |
DateTime |
| LicenseType | field_32 |
Choice |
| ProcessingLogs | field_53 |
Multi-line Text |
| PrivateEmail | field_59 |
Text |
List: CompanyDomains
List ID: 29aab1ae-2bd1-4ae9-843d-a352e0c67f57
| Display Name | Internal Name | Type |
|---|---|---|
| Title | Title |
Text (company name) |
| DomainSuffix | DomainSuffix |
Text (e.g. harriscomputer.eu) |
| CountryCode | CountryCode |
Text (2-letter, e.g. DE) |
3. License SKU Configuration
License SKU IDs are tenant-specific GUIDs. Find yours with PowerShell:
Connect-MgGraph -Scopes "Organization.Read.All"
Get-MgSubscribedSku | Select-Object SkuPartNumber, SkuId | Format-Table
Then update either config.js → ONBOARD_CONFIG.licenses
(hardcoded, requires redeploy) or the Settings modal → License Configuration
section (stored in localStorage, per-browser).
4. Power Automate Flow URLs
| Key | Purpose | Trigger Type |
|---|---|---|
asanaToOnboard |
Asana task → SharePoint request | Webhook |
creationComplete |
Notify when user created | HTTP POST |
sendCredentials |
Email credentials to private email | HTTP POST |
5. Local Development
# Serve locally with SWA CLI
npx @azure/static-web-apps-cli start .

# Or use any static server
npx serve .
python3 -m http.server 8080
For development without Azure credentials, open the browser console and run:
enterMockMode()
This loads fake data and bypasses authentication.
6. Deployment
swa deploy . --app-name ONBoard --resource-group autoOnboarding
| Property | Value |
|---|---|
| Resource Group | autoOnboarding |
| Static Web App name | ONBoard |
| Live URL | https://zealous-island-0a17abf03.4.azurestaticapps.net |
Admin: Architecture
System Overview
ON Board is a client-side SPA — there is no backend server. The admin's browser authenticates via MSAL, then makes direct Microsoft Graph API calls to create users and manage SharePoint data.
┌──────────────────────────────────────────────────────────┐
│  Browser (index.html)                                    │
│                                                          │
│  ┌─────────┐  ┌─────────┐  ┌───────────┐  ┌──────────┐ │
│  │ auth.js │  │ app.js  │  │provision.js│  │ phone.js │ │
│  └────┬────┘  └────┬────┘  └─────┬─────┘  └────┬─────┘ │
│       └────────────┴──────┬──────┴──────────────┘        │
│                      ┌────┴────┐                         │
│                      │graph.js │                         │
│                      └────┬────┘                         │
└───────────────────────────┼──────────────────────────────┘
                            │ HTTPS (Bearer Token)
               ┌────────────┼────────────┐
               │            │            │
        ┌──────┴──────┐ ┌──┴───┐ ┌──────┴──────┐
        │  SharePoint │ │Entra │ │Power Automate│
        │  Lists      │ │ID    │ │  Flows       │
        └─────────────┘ └──────┘ └──────────────┘
Request Lifecycle
Asana Task (L1 submits)
    │
    ▼ Power Automate flow
SharePoint "OnboardingRequests" list [Status: Pending]
    │
    ▼ Dashboard loads via Graph API
ON Board Dashboard (admin sees request card)
    │
    ├─ Edit → PATCH SharePoint item
    ├─ Reject → Status: Rejected
    │
    └─ Approve →
        Status: Creating
        │
        ▼ POST /v1.0/users
        Create Entra ID user
        │
        ▼ PUT /users/{id}/manager/$ref
        Assign manager
        │
        ▼ POST /users/{id}/assignLicense
        Assign M365 license
        │
        ▼ (optional) Assign phone license + number
        │
        ▼ (optional) POST to Power Automate → send credentials email
        │
        Status: Created ✅  (or Failed ❌)
Authentication Flow
- Page loads →
initAuth()creates MSAL instance handleRedirectPromise()checks for returning auth redirect- If no session → show sign-in gate
- User clicks "Sign In" →
loginRedirect()(full-page redirect to Microsoft) - After auth → redirect back → token stored in localStorage
acquireTokenSilent()for API calls → falls back to redirect if expired
Script Load Order
1. msal-browser.min.js  (CDN - Microsoft)
2. config.js            (ONBOARD_CONFIG object)
3. notifications.js     (notify global)
4. loading.js           (loading global)
5. auth.js              (initAuth, getAccessToken)
6. graph.js             (Graph API)
7. provision.js         (provisioning)
8. reports.js           (reporting)
9. phone.js             (phone setup)
10. settings.js         (settings)
11. app.js              (main — depends on everything above)
Key Design Decisions
- No backend server
- All operations run client-side via delegated Graph API permissions. The signed-in admin's token determines what they can do.
- SharePoint as database
- Avoids spinning up a separate database. SharePoint lists store all request data with native versioning and permissions.
- Field mapping layer
- SharePoint auto-generates internal names (
field_2,field_6) that differ from display names.graph.jsmaintains a mapping constant to translate between app-friendly names and SharePoint internals. - Mock mode
enterMockMode()bypasses auth and loads fake data, allowing UI development and testing without Azure credentials.- Password stored in InternalNotes
- Generated in-memory by
provision.js, passed to the Graph API, and persisted in the SharePointInternalNotescolumn for admin reference. Optionally emailed via Power Automate flow.